Configuring the APIM Connector using the REST API
In this section we will configure the connector with a tenant and create all the resources required to eventually allow a developer to register an app, that provides access to a Solace Event Broker:
Set up a tenant in the connector
Create an environment - register a PubSub+ broker as an API gateway
Create an API (Async API)
Create an API Product - associating the API with an environment and configuring the allowed protocols
Create a developer
Create an app that is using the API Product
The Connector’s REST API is documented using Open API and you can
explore the API by browsing to
http://{connector_host}:{connector_port}/api-explorer.
Conventions
The API call examples below use curl.
The following place holders are used in the cURL commands, you need to
replace these with the correct values: * {connector_host}: host
name or IP of the connector server * {connector_port}: port of the
connector server * {org_admin_name}: user name of a user with
org-admin privileges * {org_admin_pwd}: password of the user with
org-admin privileges * {org_name}: name of the organisation/tenant
you want to create
Set up an organisation (tenant) in the connector
In order to create an organisation the call must be made using
credentials of a user with platform-admin privileges. (refer back to
the deployment section which outlines how the users are configured).
In the call below you need to replace the following (in addition to the
common placeholders documented above): * {connector_admin_name}:
user name of a user with platform-admin privileges *
{connector_admin_pwd}: password of the user with platform-admin
privileges * {cloud_token}: an API token for Solace Cloud - see
above for how to create this token
curl --location --request POST 'http://{connector_host}:{connector_port}/v1/organizations' \
--user {connector_admin_name}:{connector_admin_pwd}> \
--header 'Content-Type: application/json' \
--data-raw '{
  "name": "{org_name}",
  "cloud-token": "{cloud_token}"
}'
Create an environment - register a PubSub+ broker as an API gateway
{service_id}: the id of a PubSub+ broker in your Solace Cloud account. You can use the first cURL command below to retrieve a list of available services and their service ids.if required adjust the protocols in the request - the Connector verifies that these protocols are enabled on the service you specify with
{service_id}
Retrieve services in the associated Solace Cloud account:
curl 'http://localhost:9090/v1/my-org/services' \
--user {org_admin_name}:{org_admin_pwd}>
Create an Environment:
curl --location --request POST 'http://{connector_host}:{connector_port}/v1/{org_name}/environments' \
--user {org_admin_name}:{org_admin_pwd}> \
--header 'Content-Type: application/json' \
--data-raw '{
  "name": "dev",
  "displayName": "dev display name",
  "description": "dev environment",
  "serviceId": "{service_id}",
  "exposedProtocols": [
    {
      "name": "secure-mqtt",
      "version": "3.1.1"
    },
    {
      "name": "https",
      "version": "1.1"
    }
  ]
}'
Create an API (Async API)
The call below uploads and creates an Async API called Test-API.
curl --location --request PUT 'http://{connector_host}:{connector_port}/v1/{org_name}/apis/Test-API' \
--user {org_admin_name}:{org_admin_pwd}> \
--header 'Content-Type: text/plain' \
--data-raw '{
  "components": {
    "schemas": {
      "SensorEvent": {
        "$schema": "http://json-schema.org/draft-04/schema#",
        "description": "",
        "type": "object",
        "properties": {
          "communicationDate": {
            "type": "integer"
          },
          "signedCommunication": {
            "type": "boolean"
          },
          "events": {
            "type": "array",
            "items": [
              {
                "type": "string"
              },
              {
                "type": "array",
                "items": [
                  {
                    "type": "object",
                    "properties": {
                      "tripPlanId": {
                        "type": "integer"
                      },
                      "sensorName": {
                        "type": "string"
                      },
                      "communicationType": {
                        "type": "string"
                      },
                      "eventType": {
                        "type": "string"
                      },
                      "gps": {
                        "type": "string"
                      },
                      "sensorValues": {
                        "type": "array",
                        "items": [
                          {
                            "type": "string"
                          },
                          {
                            "type": "object",
                            "properties": {
                              "Uncertainty": {
                                "type": "string"
                              },
                              "Compass Direction": {
                                "type": "string"
                              }
                            },
                            "required": [
                              "Uncertainty",
                              "Compass Direction"
                            ]
                          }
                        ]
                      },
                      "sensorValue": {
                        "type": "string"
                      },
                      "deviceSerialNumber": {
                        "type": "string"
                      },
                      "eventDate": {
                        "type": "integer"
                      },
                      "sensorId": {
                        "type": "integer"
                      }
                    },
                    "required": [
                      "deviceSerialNumber",
                      "eventDate",
                      "eventType",
                      "communicationType",
                      "gps",
                      "sensorName",
                      "sensorValue",
                      "sensorValues",
                      "tripPlanId",
                      "sensorId"
                    ]
                  }
                ]
              }
            ]
          },
          "deviceSerialNumber": {
            "type": "string"
          },
          "validatedSignature": {
            "type": "boolean"
          }
        },
        "required": [
          "events",
          "deviceSerialNumber",
          "communicationDate",
          "signedCommunication",
          "validatedSignature"
        ]
      }
    },
    "messages": {
      "GeoSensorEvent": {
        "payload": {
          "$ref": "#/components/schemas/SensorEvent"
        },
        "description": "",
        "schemaFormat": "application/vnd.aai.asyncapi+json;version=2.0.0",
        "contentType": "application/json"
      },
      "SensorEvent": {
        "payload": {
          "$ref": "#/components/schemas/SensorEvent"
        },
        "description": "",
        "schemaFormat": "application/vnd.aai.asyncapi+json;version=2.0.0",
        "contentType": "application/json"
      }
    }
  },
  "servers": {},
  "channels": {
    "traxens/feed/{shippingline}/v1/{equipmentId}/{sensor}/{sensorvalue}": {
      "publish": {
        "message": {
          "$ref": "#/components/messages/SensorEvent"
        }
      },
      "parameters": {
        "shippingline": {
          "schema": {
            "type": "string"
          }
        },
        "sensor": {
          "schema": {
            "type": "string",
            "enum": [
              "HUMIDITY",
              "LIGHT",
              "DOOR",
              "GEOFENCE"
            ]
          }
        },
        "sensorvalue": {
          "schema": {
            "type": "string"
          }
        },
        "equipmentId": {
          "schema": {
            "type": "string"
          }
        }
      }
    },
    "traxens/feed/{shippingline}/v1/{equipmentId}/{geosensor}/{longitude}": {
      "publish": {
        "message": {
          "$ref": "#/components/messages/GeoSensorEvent"
        }
      },
      "parameters": {
        "geosensor": {
          "schema": {
            "type": "string",
            "enum": [
              "GEOPOSITIONING"
            ]
          }
        },
        "shippingline": {
          "schema": {
            "type": "string"
          }
        },
        "equipmentId": {
          "schema": {
            "type": "string"
          }
        },
        "longitude": {
          "schema": {
            "type": "string"
          }
        }
      }
    }
  },
  "asyncapi": "2.0.0",
  "info": {
    "x-generated-time": "2021-07-15 15:03 UTC",
    "description": "",
    "title": "WebSub API",
    "x-view": "provider",
    "version": "1",
    "x-origin": {
      "vendor": "solace",
      "name": "event-portal"
    }
  }
}'
Create an API Product
Now let’s package the API - configure which protocols and quotas,
quality of service apply by using an API product called
Test-API_PRODUCT.
Note how the requets below references the API we created in the previous step:
"apis": [
    "Test-API"
],
curl --location --request POST 'http://{connector_host}:{connector_port}/v1/{org_name}/apiProducts' \
--user {org_admin_name}:{org_admin_pwd}> \
--header 'Content-Type: application/json' \
--data-raw '{
  "apis": [
      "Test-API"
  ],
  "approvalType": "auto",
  "attributes": [
  ],
  "description": "Test-API_PRODUCT",
  "displayName": "Test-API_PRODUCT",
  "environments": [
    "dev"
  ],
  "name": "Test-API_PRODUCT",
  "protocols": [
    {
      "name": "https",
      "version": "1.1"
    }
  ],
  "clientOptions": {
    "guaranteedMessaging": {
      "requireQueue": true,
      "accessType": "exclusive",
      "maxTtl": 3600,
      "maxMsgSpoolUsage": 50
    }
  }
}'
Create a developer
Next let’s create a developer, who will be able to register apps in
order to gain access to APIs. Take a note of the user name, we will need
it in the call further below to register an application.
"userName": "daisy".
curl --location --request POST 'http://{connector_host}:{connector_port}/v1/{org_name}/developers' \
--header 'Content-Type: application/json' \
--user {org_admin_name}:{org_admin_pwd}> \
--data-raw '{
    "email": "daisy@duck.com",
    "firstName": "Daisy",
    "lastName": "Duck",
    "userName": "daisy"
}'
Create an app
The last step is registering an app for the developer (daisy in the
example above). We will also reference the API Product we have created
before.
{app_name}: the name of the app we want to create, we can also use this later to retrieve app information.{developer_name}: this is the developer’s username,daisyin the example above.{api_product_name}: the API Product name,Test-API_PRODUCTin the example we used above
Once the app is registered the developer is able to connect to a Solace PubSub+ service, see the second call below on how the developer can retrieve app details including the connectivity information such as protocol, host and port.
curl --location --request POST 'http://localhost:9090/v1/{org_name}/developers/{developer_name}/apps' \
--user {org_admin_name}:{org_admin_pwd}> \
--header 'Content-Type: application/json' \
--data-raw '{
  "name": "{app_name}",
  "displayName": "{app_name}",
  "expiresIn": 0,
  "apiProducts": [
    "{api_product_name}"
  ],
  "credentials": {
  }
}'
Getting the app details:
curl --location 'http://localhost:9090/v1/{org_name}/developers/{developer_name}/apps/{app_name}' \
--user {org_admin_name}:{org_admin_pwd}>
Integrating the Connector with API Management Platforms
WSO2 API Management
The API Management Connector can be easily integrated with WSO2 API Management version 4.1.0 (and above).
This section describes the initial configuration of the Connector and WSO2 API Management and provides a walkthrough of the API life cycle in WSO2 API Management.
Prepare the API Management Connector
An initial configuration of the Connector must be carried out using its REST API: * Setting up an Organization * Setting up an Envrionment * Setting up a generic developer (TODO - streamline)
Set up an organisation (tenant) in the connector
In order to create an organisation the call must be made using
credentials of a user with platform-admin privileges. (refer back to
the deployment section which outlines how the users are configured).
In the call below you need to replace the following (in addition to the
common placeholders documented above): * {connector_admin_name}:
user name of a user with platform-admin privileges *
{connector_admin_pwd}: password of the user with platform-admin
privileges * {cloud_token}: an API token for Solace Cloud - see
above for how to create this token * {org_name}: the name of the
tenant you want to create. Note: remember the ``org_name`` as you need
it to configure the WSO2 API Management
curl --location --request POST 'http://{connector_host}:{connector_port}/v1/organizations' \
--user {connector_admin_name}:{connector_admin_pwd}> \
--header 'Content-Type: application/json' \
--data-raw '{
  "name": "{org_name}",
  "cloud-token": "{cloud_token}"
}'
Create an environment - register a PubSub+ broker as an API gateway
{service_id}: the id of a PubSub+ broker in your Solace Cloud account. You can use the first cURL command below to retrieve a list of available services and their service ids.if required adjust the protocols in the request - the Connector verifies that these protocols are enabled on the service you specify with
{service_id}
Retrieve services in the associated Solace Cloud account:
curl 'http://localhost:9090/v1/my-org/services' \
--user {org_admin_name}:{org_admin_pwd}>
Locate the service you want to use for your environment in the response
and take note of its serviceId, you need it in the payload of the
next call to create an environment.
Also take note of the endpoint URIs for ws-mqtt, wss-mqtt,
http and https. See this partial example response of the REST
call (the actual response may contain more protocols):
"messagingProtocols": [
  {
    "compressed": "no",
    "secure": "no",
    "protocol": {
      "name": "ws-mqtt",
      "version": "3.1.1"
    },
    "transport": "WS",
    "uri": "ws://{service_id}.messaging.solace.cloud:8000"
  },
  {
    "compressed": "no",
    "secure": "yes",
    "protocol": {
      "name": "wss-mqtt",
      "version": "3.1.1"
    },
    "transport": "WSS",
    "uri": "wss://{service_id}.messaging.solace.cloud:8443"
  },
  {
    "compressed": "no",
    "secure": "no",
    "protocol": {
      "name": "http",
      "version": "1.1"
    },
    "transport": "HTTP",
    "uri": "http://{service_id}.messaging.solace.cloud:9000"
  },
  {
    "compressed": "no",
    "secure": "yes",
    "protocol": {
      "name": "https",
      "version": "1.1"
    },
    "transport": "HTTPS",
    "uri": "https://{service_id}.messaging.solace.cloud:9443"
  }
],
Create an Environment:
curl --location --request POST 'http://{connector_host}:{connector_port}/v1/{org_name}/environments' \
--user {org_admin_name}:{org_admin_pwd}> \
--header 'Content-Type: application/json' \
--data-raw '{
  "name": "dev",
  "displayName": "dev display name",
  "description": "dev environment",
  "serviceId": "{service_id}",
  "exposedProtocols": [
    {
      "name": "secure-mqtt",
      "version": "3.1.1"
    },
    {
      "name": "https",
      "version": "1.1"
    }
  ]
}'
Note: Remember the environment name
Create a developer
Next let’s create a generic developer, which will be used by WSO2 API
Management . Take a note of the user name, we will need it when
configuring WSO2. "userName": "wso2-apim".
curl --location --request POST 'http://{connector_host}:{connector_port}/v1/{org_name}/developers' \
--header 'Content-Type: application/json' \
--user {org_admin_name}:{org_admin_pwd}> \
--data-raw '{
    "email": "apim@wso2.org",
    "firstName": "User",
    "lastName": "APIM",
    "userName": "wso2-apim"
}'
Integrating the Connector into WSO2 API Management
Open the <API-M_HOME>/repository/conf/deployment.toml file and add
the following according to your account details. Make sure to restart
the server after adding the configurations.
[[apim.gateway.environment]]
name = <Name of the Solace Environment>
display_name = <Display Name of the Solace Environment>
type = <Type of the Environment>
display_in_api_console = <Displays the environment under 'Try it' in the API Developer Portal, in the API console>
description = <Description about Solace Environment>
provider = <Vendor name of the environment. (Must be "solace")>
service_url = <Base URL of the Solace broker>
username = <Username of the Solace broker account>
password = <Password of the Solace broker account>
ws_endpoint = <WS Endpoint of the Solace broker environment>
wss_endpoint = <WSS Endpoint of the Solace broker environment>
http_endpoint = <HTTP Endpoint of the Solace broker environment>
https_endpoint = <HTTPS Endpoint of the Solace broker environment>
show_as_token_endpoint_url = false

[apim.gateway.environment.properties]
Organization = <Password of the Solace broker account>
DevAccountName = <Password of the Solace broker account>
Note that only all these properties are mandatory, except show_as_token_endpoint_url.
Use the following values for the properties:
name: the environment name must match the name of the environment that was configured in the Connector (previous step)display_name: the friendly name of the environment that is displayed in API Management.type: you can usehybriddisplay_in_api_console:trueor falsedescription: description as displayed in API Managementprovider: must besolaceservice_url: the base URL of the Connector -http://{connector_host}:{connector_port}/v1username: the username of an organisation level administrator (org-admin) that is configured in the Connector -{org_admin_name}in cURL examples abovepassword: the password of the organisation level administrator (org-admin) that is configured in the Connector -{org_admin_pwd}in cURL examples abovews_endpoint: use the endpoint URI for thews-mqttprotocol as returned by theservicesREST API call in the section abovewss_endpoint: use the endpoint URI for thewss-mqttprotocol as returned by theservicesREST API call in the section abovehttp_endpoint: use the endpoint URI for thehttpprotocol as returned by the``services`` REST API call in the section abovehttps_endpoint: use the endpoint URI for thehttpsprotocol as returned by theservicesREST API call in the section aboveOrganization: the organization name as configured in the Connector -{org_name}DevAccountName: the name of the developer account -wso2-apimin the example configuration in the section above.
The Solace broker gateway is now available in the API Publisher.

Creating and deploying an API
You can use the Async API specification generated from the Solace PubSub+ Event Portal or any other source to create APIs in WSO2 API Manager.
Importing an Async API
Before you begin: Make sure that you have integrated the Solace event broker with WSO2 API Manager as shown in the above section.
Login to the API Publisher via https://:9443/publisher
Click CREATE API and then click Import AsyncAPI Definition
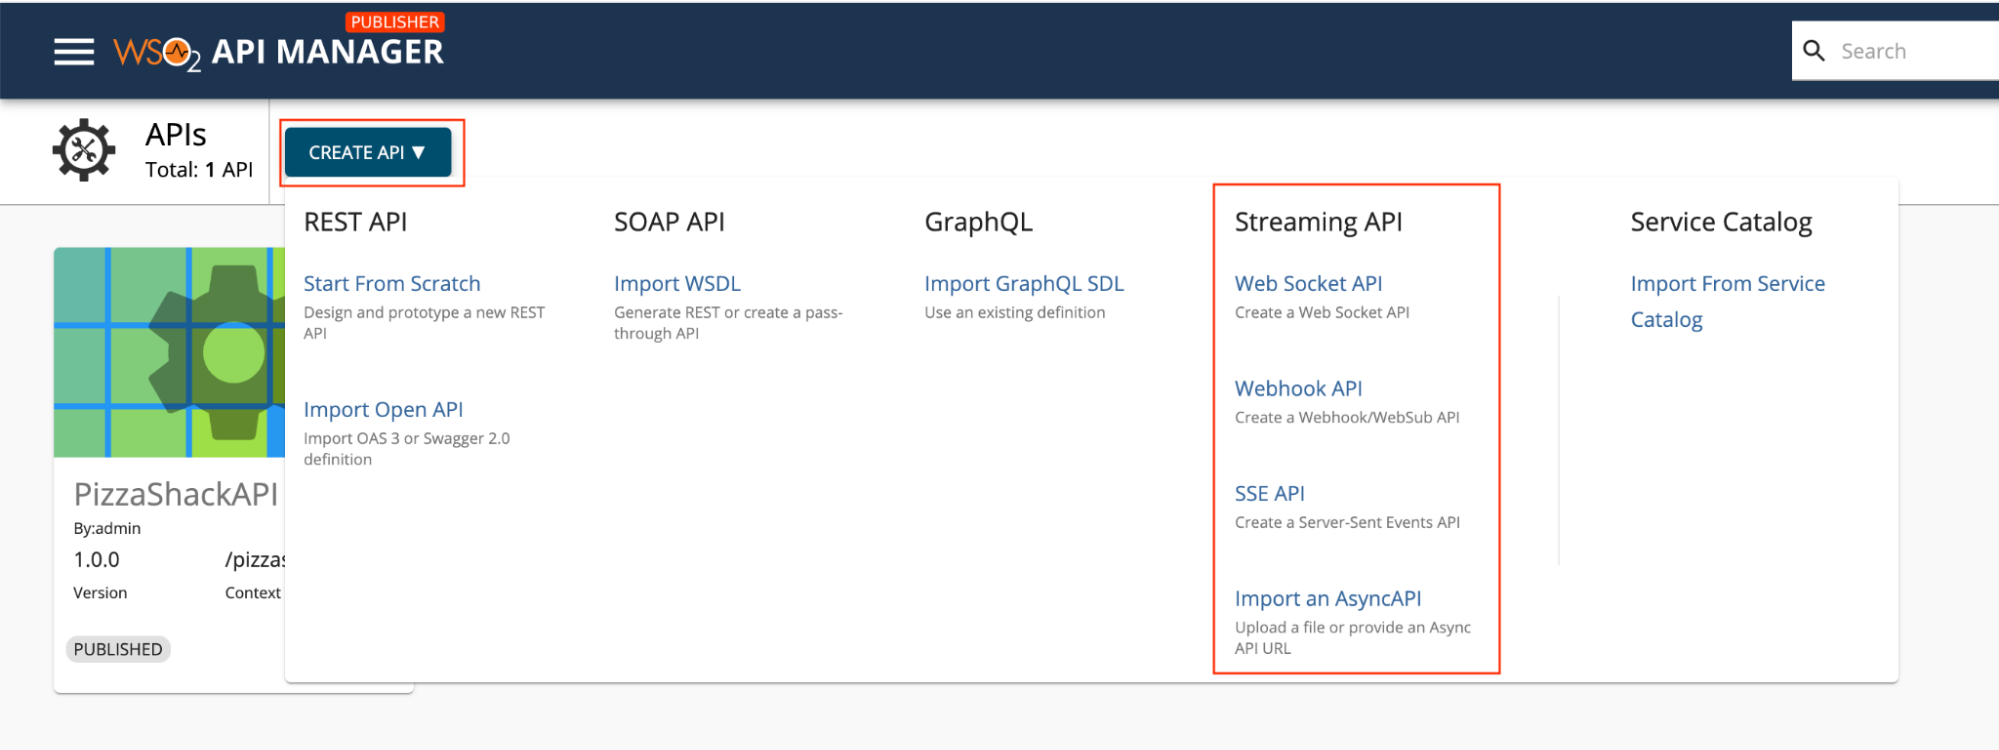
The following two options to import the AsynAPI definition appear.
AsyncAPI URL - If you select this option, you need to provide a URL of a Solace API Specification.
AsyncAPI File - If you select this option, click Browse File to Upload and upload a file, which contains a Solace AsyncAPI definition. Select your preferred method and click NEXT.
Info
If the Async API specification is a valid Solace Async API specification, the portal will display the
Identified as Solace Event Portal APItag.Edit the Solace Async API information and click Create.
Note
The Async API definition of the Solace API will contain the specific API definition, with the supported protocols, such as HTTP, MQTT, AMQP, that the API topics have to use. You do not need to provide the protocol information separately
Importing an Async API from Solace Event Portal
When you choose the AsyncAPI URL option during import you can
provide the URL of the AsyncAPI spec published in Solace Event Portal.
See Creating and Sharing Event API Products for details.
Configuring Topics
Click Topics to navigate to the topics page.
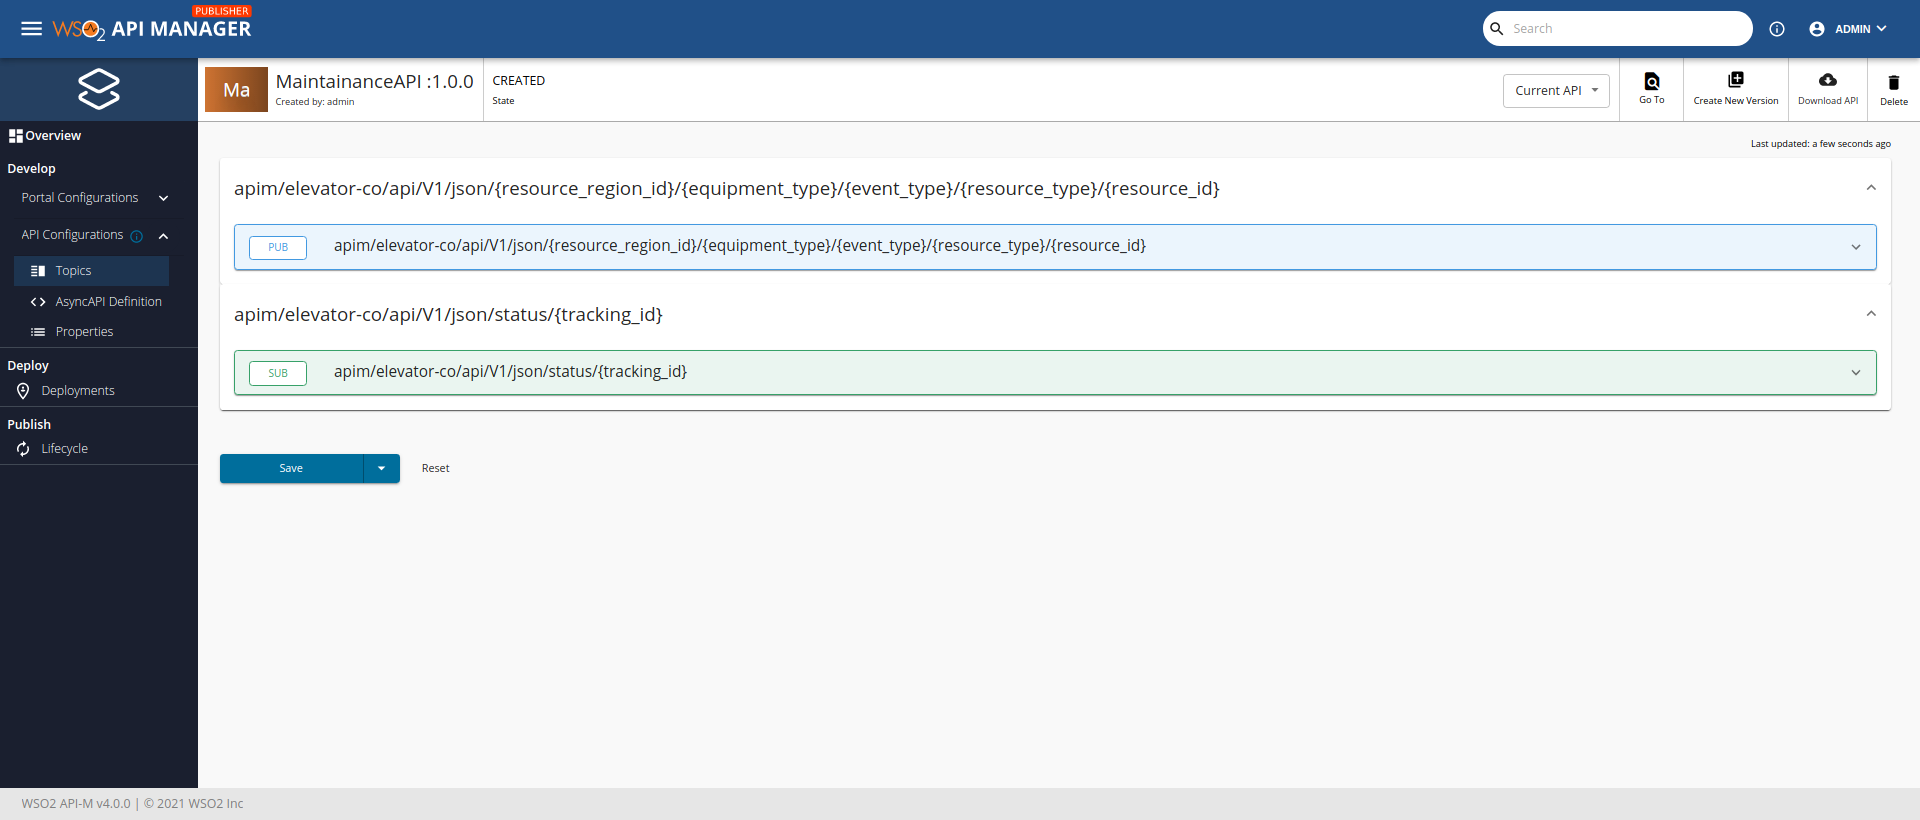 The topics will be created automatically from the Solace
AsyncAPI definition provided in the previous step.
The topics will be created automatically from the Solace
AsyncAPI definition provided in the previous step.
Viewing the Async API definition
Go to API Configurations and click AsyncAPI Definition to see the definition of the API you created in the previous step.
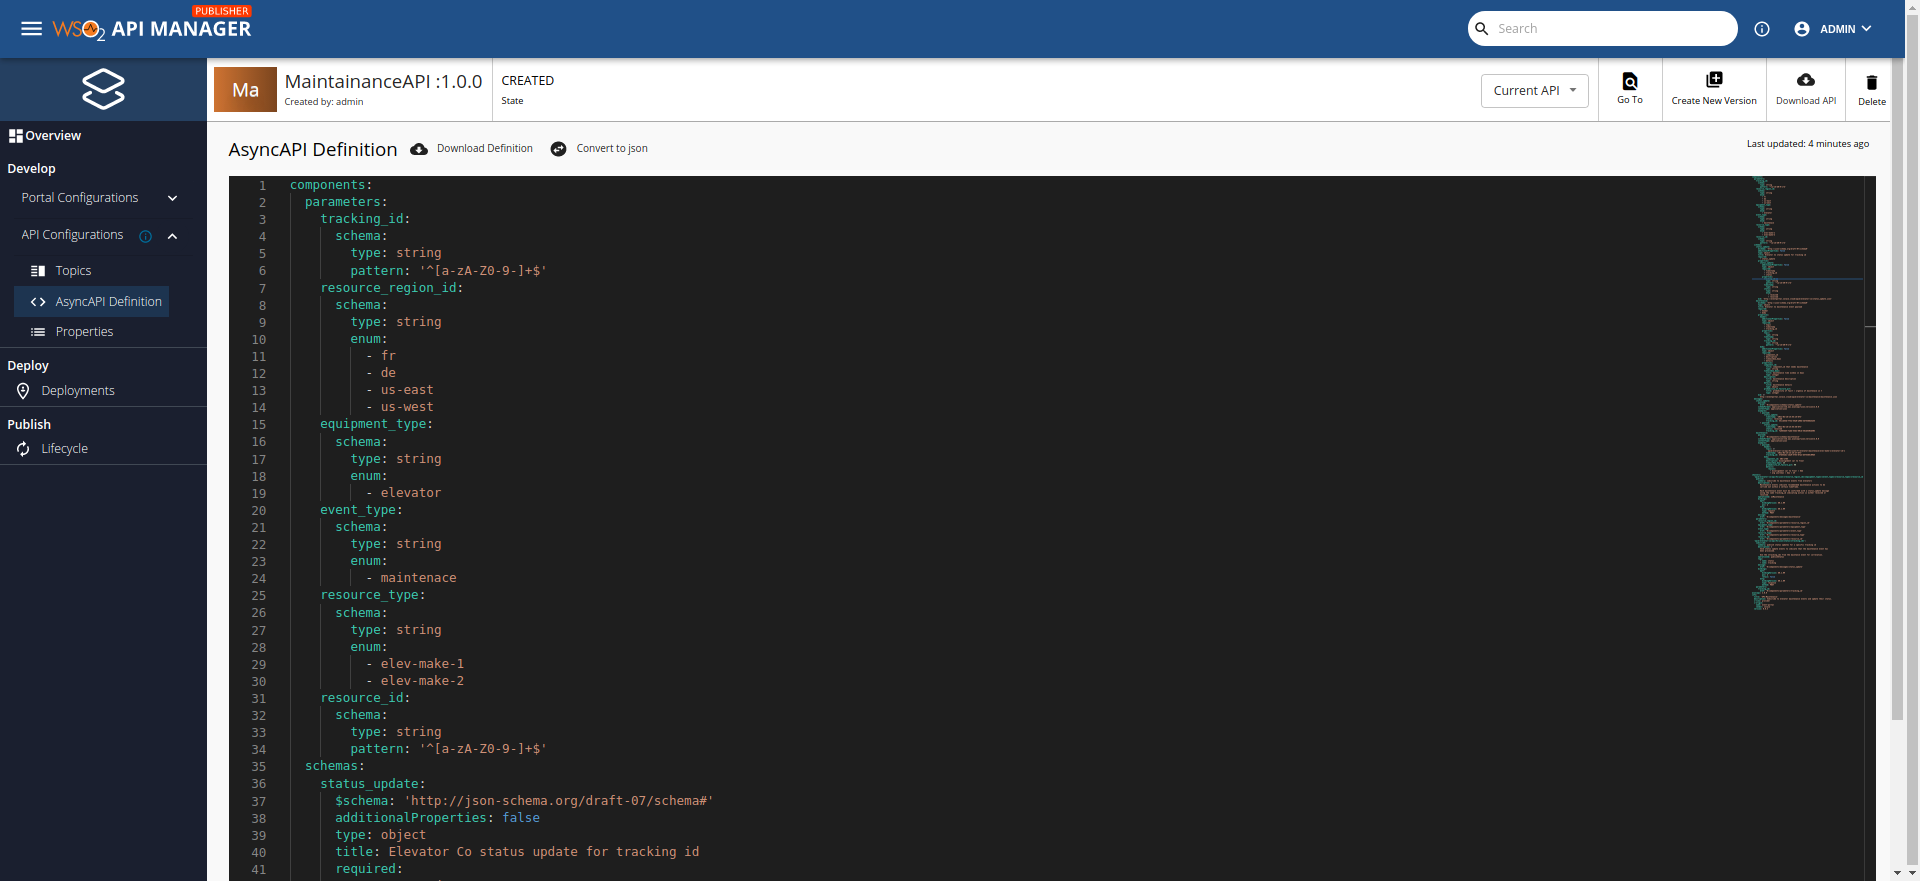
Note
The Solace API specification cannot be edited from the API manager Publisher portal. But the specification can be downloaded and changed externally to make the required changes.
Warn
The current version of WSO2 API Manager only supports AsyncUnlimited Protocol as the API level subscription policy for Solace APIs. Once a subscription is made, that policy will be added automatically.
Deploying the API to the Solace PubSub+ environment
Navigate to the Deploy section and go to Deployments.
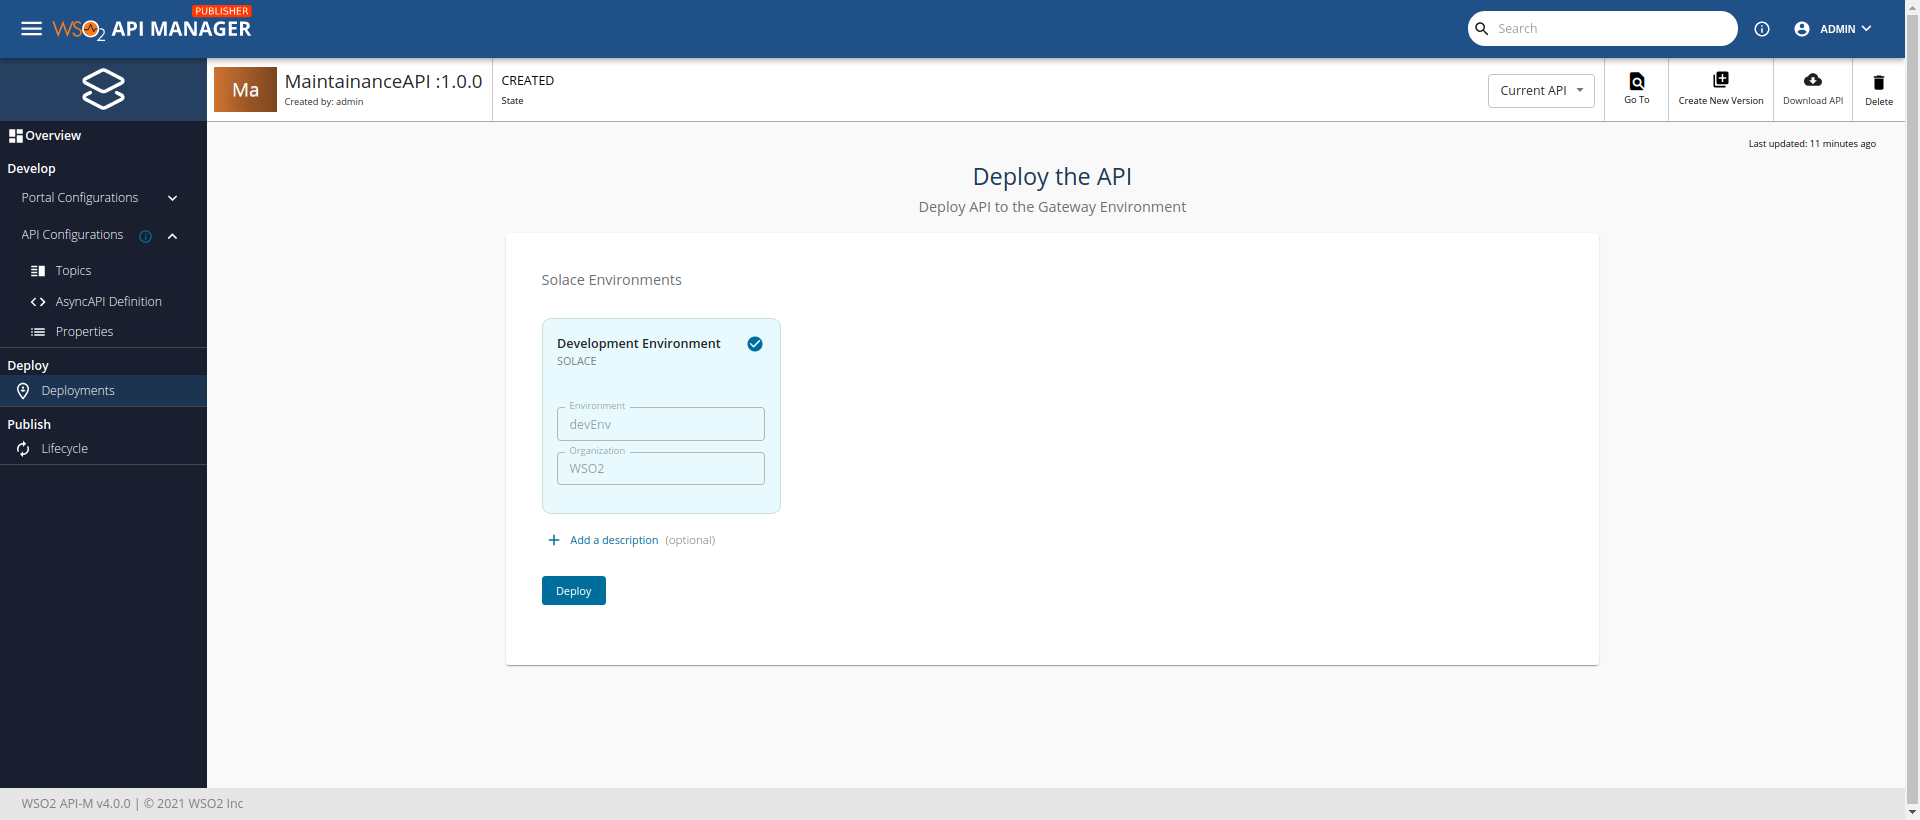
Select the Deployment environment and click Deploy.
The API revision will be created. Select the API revision and click Deploy.
The Solace API will be deployed to the Solace Broker environment that is user-provided.

Publishing the API
See Publish an API for instructions on publishing the API created in the previous steps.
Subscribing to an API
You have to subscribe to a published Solace API before consuming them. The subscription process fulfills the authentication process and provides you with access tokens that you can use to invoke an API. The subscription flow will be controlled by the WSO2 API Manager.
When the Application is attached with a Solace API Subscription, the solace broker will keep a copy of that Application for the authentication and validation process of the tokens generated by the WSO2 API Manager.
The following are the two methods available in the Developer Portal to subscribe an API to an application.
Subscribe to an existing application - You can subscribe to a current API by selecting an existing application.
Subscribe to an API using Key Generation Wizard - You can use the SUBSCRIPTION & KEY GENERATION WIZARD option to start the subscription process from scratch.
Note that the artifacts are deployed in the Solace broker, therefore API level and application-level throttling will not be supported for the Solace API subscriptions.
Invoking an API
In this section, you will subscribe to the AsyncAPI through the Developer Portal
Subscribing to the Solace API
Log in to the Developer Portal via
https://:9443/devportalSelect your Solace API and navigate to the Overview.
Subscribe to your API using the sample application. You can also create a new application for this purpose.
Generating keys
In the sample application, click Production Keys and navigate to OAuth2 Tokens.

Locate the consumer key and consumer secret, these will be used as credentials to connect to the Solace PubSub+ service. For instructions on generating keys see, Application Keys.
Selecting the Async Protocol and Topic
Select the Solace API and click on the Solace Info section in the left menu. This will render an information page like the following.
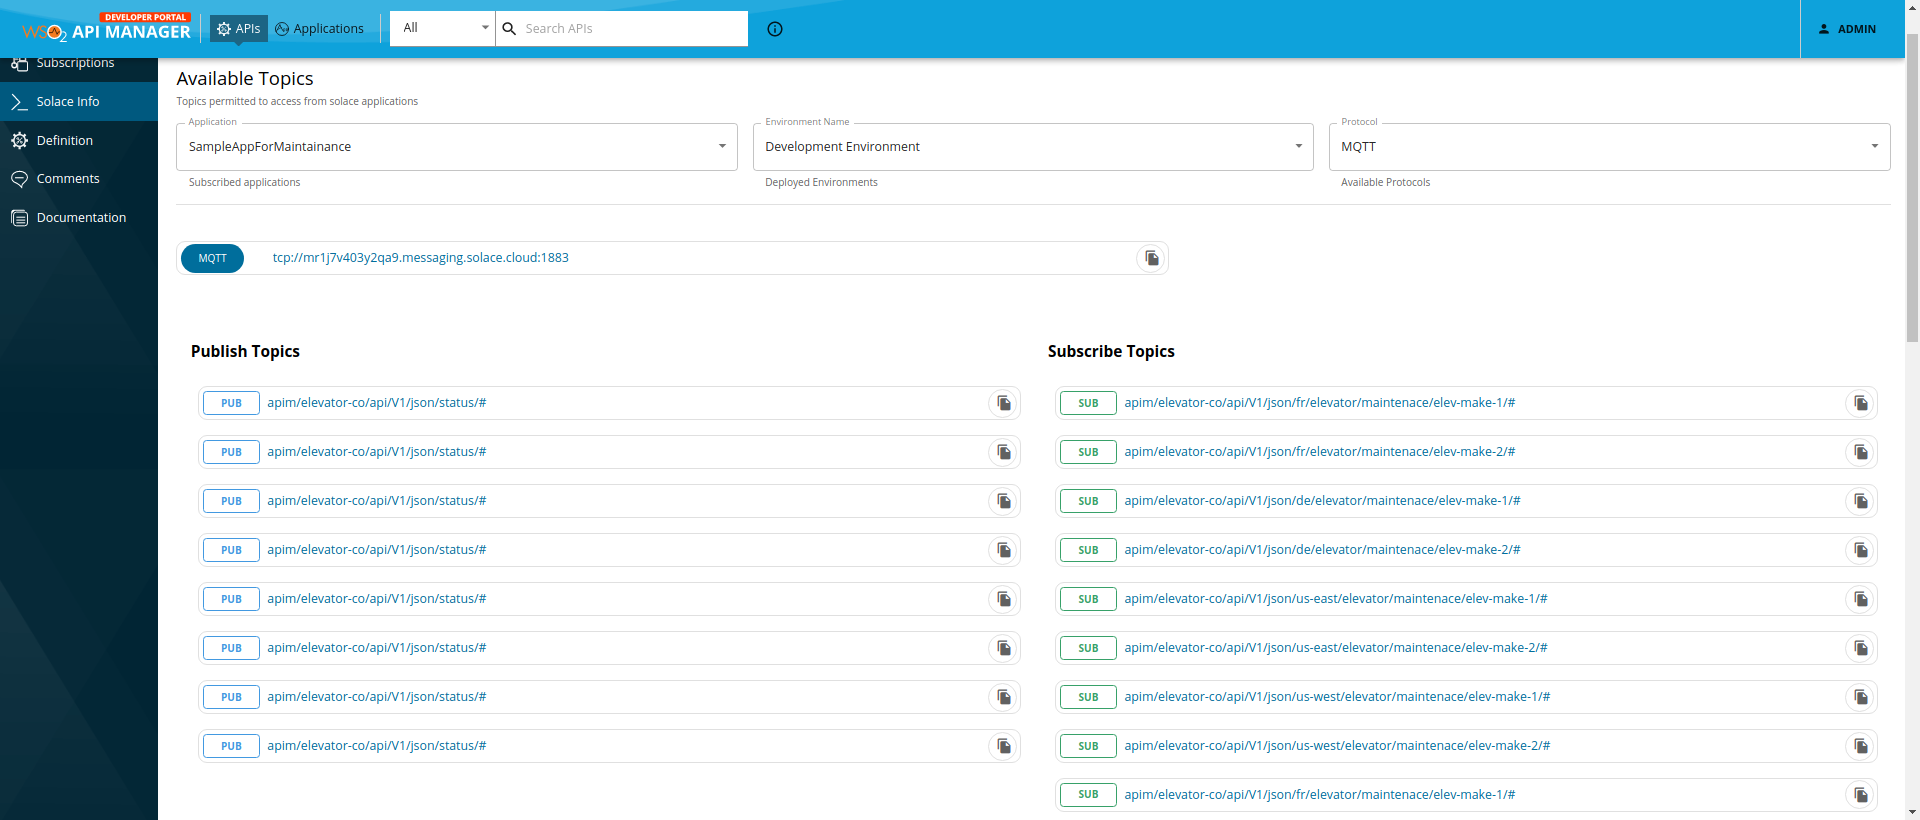
Select the Application, Environment, and Protocol from the dropdowns of the info page.
Application - Select the required application of the subscribed Application of the Solace API.
Environment - Select the deployed Solace broker environment that needs to be used.
Protocol - Type of the transport protocol to invoke the Async topics with. The topics supported for the selected Application, Environment and Protocol will be rendered.
Copy the endpoint URL of the protocol of the selected environment.

Copy the topic that needs to be consumed. Click on the Copy icon in front of the topic.
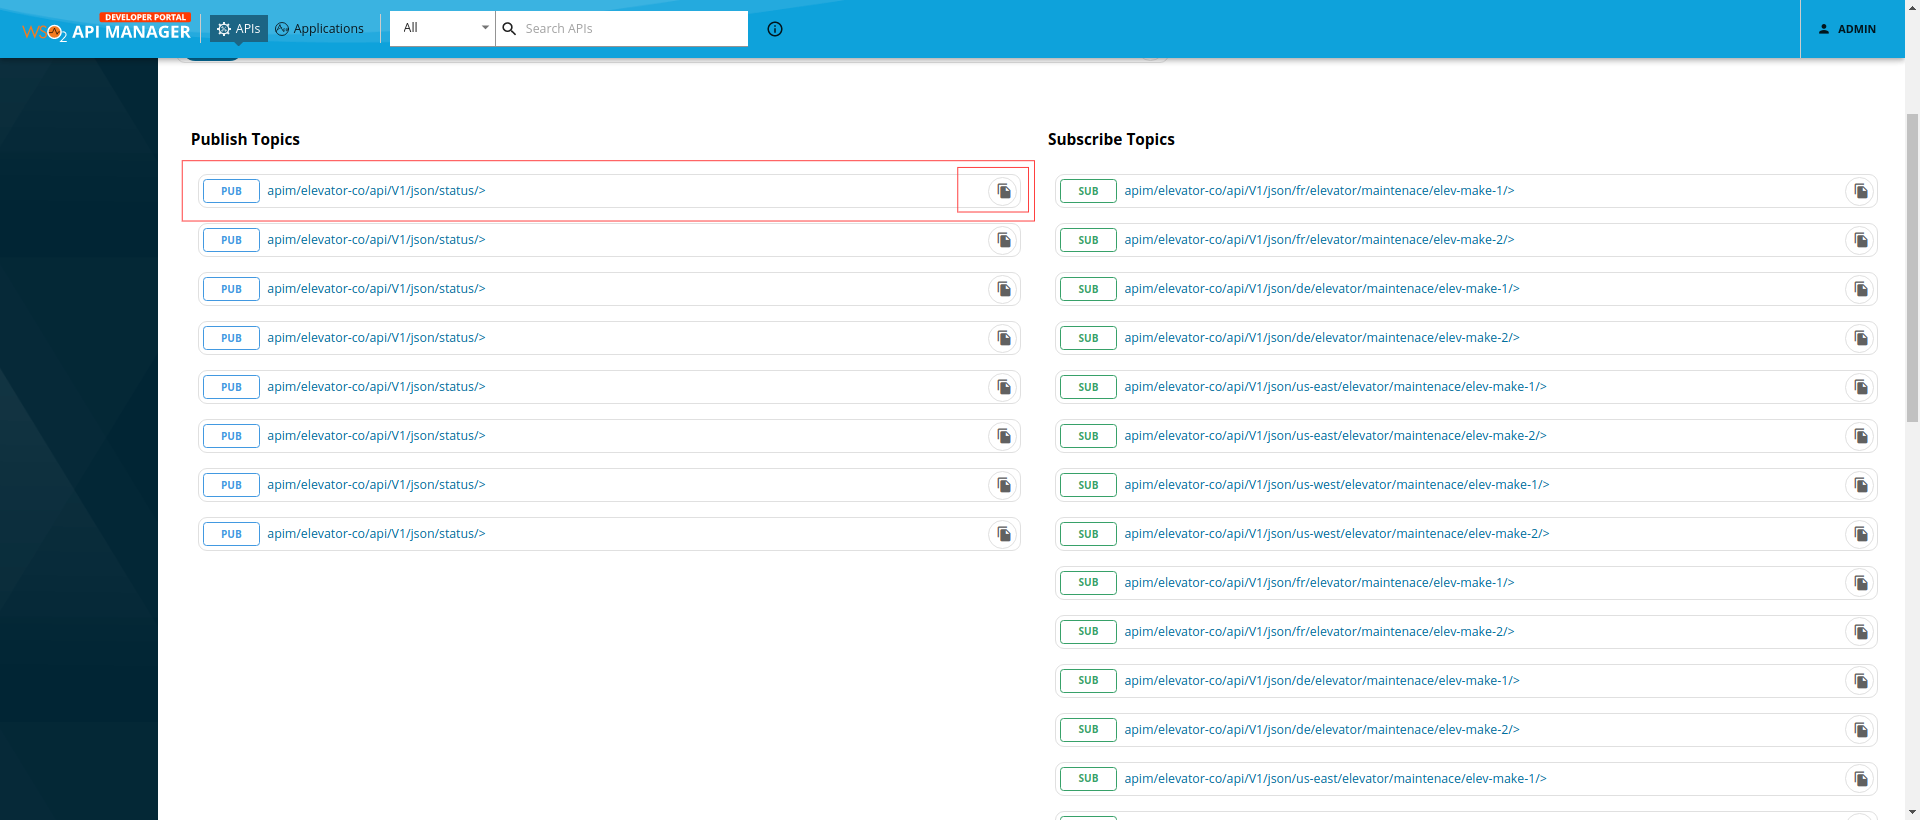
Then use this information to create a request on the desired protocol to invoke the topic and consume the topic.
Publishing messages using HTTP
If your Async API is available via HTTP you can use the information gathered above to publish an event using a simple HTTP POST.
You need the following information: * {endpoint_url}: the endpoint
URL (http or https) * {topic}: a topic you wish to publish to *
{consumer_key}: your consumer key for the appropriate environment *
{consumer_secret}: your consumer secret for the appropriate
environment
curl --location --request POST '{endpoint_url}/{topic}' \
--header 'Content-Type: application/json' \
--user {consumer_key}:{consumer_secret}> \
--data-raw '{
    "value": "1"
}'
Subscribing to messages using MQTT
If your Async API is available via MQTT you can use the information gathered above to subscribe to topics using an MQTT client.
You need the following information: * {endpoint_url}: the endpoint
URL (http or https) * {topic}: a topic subscription *
{consumer_key}: your consumer key for the appropriate environment *
{consumer_secret}: your consumer secret for the appropriate
environment
In this example we will use an MQTT client called MQTT Box for demonstration purposes.
** Note:** MQTT Box is available as a browser plugin or standalone application. You can use any other MQTT client that you wish instead.
Create a connection to the PubSub+ service

Use the hostname and port from the
endpoint_urlasHostand select the appropriateProtocolin the drop down list , the screenshot illustrates the settings for the this examplews://{service_id}.messaging.solace.cloud:8000Use your
{consumer_key}asUsernameand the{consumer_secret}asPassword
Save the connection, it should now show as connected.
Add a subscription in MQTT Box using the
{topic}that you want to subscribe to: